
Taking a screenshot on a Macbook is a simple task. By just pressing either
1. Command+Shift+3 : you can capture or grab the whole screen
2. Command+Shift+4 : is used to capture only a specific part which we selected of the screen
3. Command+Shift+4+Space : to take the screenshot of any open window
The best thing about these quick and easy methods is that you do not have to save them manually like in Windows as they are already automatically saved on the desktop! Unfortunately, there is still a downside of it and it is taking continuous screenshots fills up your desktop making the final outcome looks bad and cluttered as the each screenshot has the thumbnails of the previously taken screenshots. To fix this they can either be deleted or transferred to somewhere else every time the desktop is filled, or you could follow this simple method to change the location where the screenshots store whenever the aforesaid keys are used to take the screenshots.
Don’t be scared by the look of it. It is really easy and even a six year old could do it. Lets go through it together slowly.
How to Change The Save Location of Screenshots on Macbook?
Here is the video which explains the steps more clearly . Please read the detailed steps below as well.
Step 1: Open the terminal app: just open the launchpad and type terminal to open the app
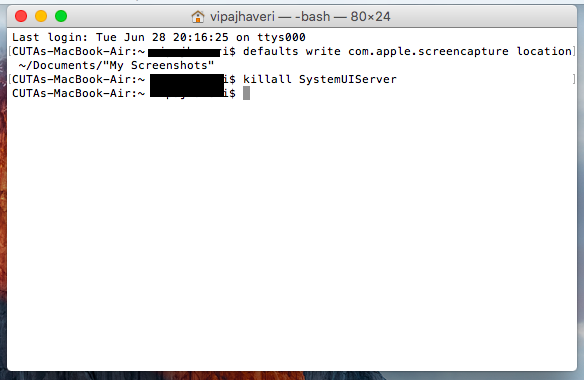
Step 2: Type the following command:
defaults write com.apple.screencapture location ~/Documents/”Screenshots”
(Note: if you wish to save it somewhere else, like in a folder called screengrabs then type the command as following
com.apple.screencapture location ~/Downloads/”Screengrabs”
)
Step 3: Hit enter to execute the command.
Step 4: To apply the changes, type the following command and press enter to execute it.
killall SystemUIServer
That’s it. Now take the screenshots without worrying of the screenshots capture the thumbnails of the previously taken screenshots. If one fine day, when you get up from the wrong side and don’t remember where your screenshots are going, then open the terminal app as explained previously and use the following two commands, then use the enter key on the keyboard to execute them.
1. defaults write com.apple.screencapture location ~/Desktop
2. killall SystemUIServer
It is so simple. After doing it for like two times you will never forget this method which changes the save location of screenshots on the Macbook.