Email filters help to remove, and move unwanted emails to trash and spam folder respectively, group emails coming from the same source, for instance Steam, or your Bank, forward them to a different email depending on the requirement, label them to identify them with ease, and automatically take any other action on them with ease.
Organizing the inbox drastically improves the productivity, saves the time, and reduces the frustration in finding relevant emails. This tutorial teaches how to Filter Emails in Gmail.
Table of Contents
Create a Basic Filter
A filter can be quickly made with the following steps. It doesn’t go in depth as it is covered in the next section. However, since a filter can be customised at any time, it’s recommended to follow these steps to make a basic filter at first.
Step 1: Open Gmail
- Navigate to Gmail.com
- Login to Gmail account.
Step 2: Define the Criteria of Search for Filter
- Select a received email in the inbox to filter the messages coming from the same source.
- Click on the three vertical dotted button in the toolbar, then select “Filter messages like these” option.
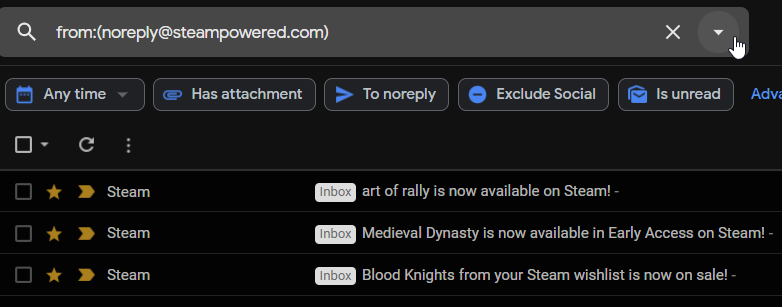
- Click on “Search” button to define the filter, and thereby filtering the existing emails as well.
Step 3: Define the Actions for Filter
- Click on the small arrow in the search bar in Gmail
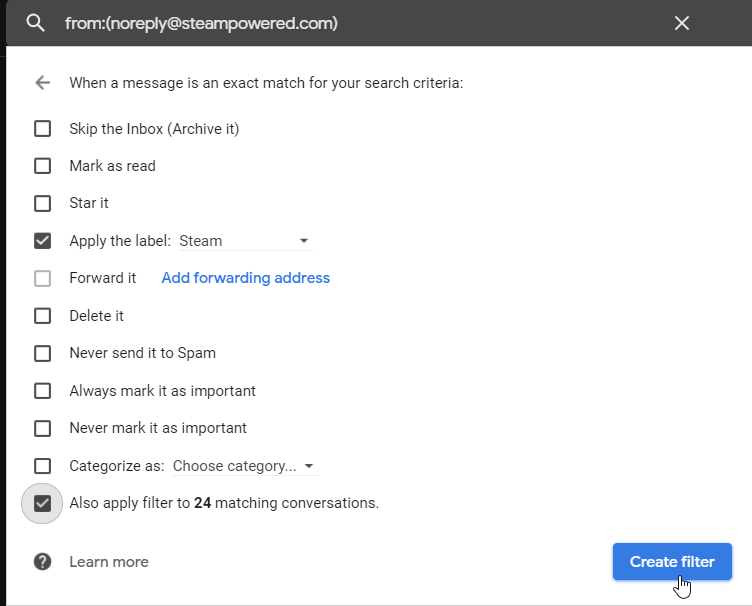
- Click “Create Filter” button.
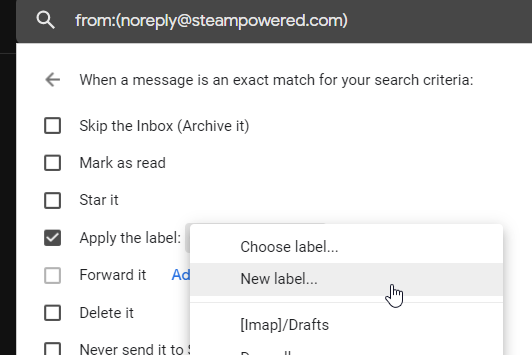
- Check “Apply the label”, and give it a desired label by which emails are categorised.
- Check “Also apply filter to X matching conversations” to include already received emails in the category as well.
- Finally Click on “Create Filter” to complete the process of creating the filter.
Customise Existing Filters
How to Customise an Existing Filter
- Navigate to “Settings”, then select “See All Settings”.
- Switch to “Filters and Blocked Addresses” tab in “Settings”
- Locate the desired filter group/label, and click “Edit” button placed in the same row.
- Criteria of Search for Filter can be customised in the first window, and Actions to apply on emails can be chosen by clicking on “Continue” button.

Define the Criteria of Search for Filter
After a basic filter was created, follow these instructions to customise an existing filter to narrow down the search to define what include in the group when filter was made. The following parameters are used to narrow down the search when defining the filter. Figuring out the correct parameters, and the values in them help in categorising the emails automatically, for instance automatically categorise emails in the given name as soon as when a new email received from steam. Usually steam sends a new email when a game is available, and it is in the Wishlist of the user.
- From: filter emails according to the from address in emails.
- To: filter the emails according to the To address in emails.
- Subject: filter the emails according to the subject line in emails.
- Has the Words: filter the emails according to specified words in the email.
- Doesn’t Have: filter the emails according to the not existing words in the email.
- Has Attachment: filter the emails which have a file or files attached to the email.
- Don’t Include Chats: filter out the emails which have conversations or hangout chat.
- Size: filter the emails when the logical expression of Size parameter is fulfilled. It has two operators, greater than, and less than, and it checks whether the email is bigger (greater) or smaller (lesser) than X number of KB (Kilobytes), or MB (Megabytes) or Bytes. Let’s say an email contains multiple attachments which increases its size to 10MB? then if the condition is “greater than” “9” “MB”, then the email is included in the search result.
- Date Within: filter the emails that received within the specified time period. If it says 3 days, then it includes emails X number of days ahead, and before from the chosen date, for instance If 3 days was chosen as the number of days, and September 10 was chosen as the date, the search includes emails from September 7 to September 13 (-3, and +3 from the chosen date).
Define the Actions for Filter
Actions stated in “Create Filter” window specify which actions are going to taken on the search result made with steps in “Define the Criteria of Search for Filter” section, for instance when “Also apply filter to X matching conversations” option is selected, “Star it” option marks the resulting emails with stars to signify their importance, “Delete it” option delete the resulting emails to the trash etc.. The following actions are currently available actions to be taken on either new and resulting emails or just new emails. Resulting emails are the emails that were filtered when searching in “Define the Criteria of Search for Filter” section.
- Skip the Inbox (Archive it): Send new emails to “All Emails” group instead of leaving them in the Inbox.
- Mark as read: Make new emails unread, and thus they are not highlighted.
- Star it: Mark the new emails with Star symbol to signify their importance.
- Apply the label: Group name to which new emails are assigned. Either a new group can be created or an existing group can be used here.
- Forward it: Forward new emails to the specified email Id. This option requires “Forwarding” option in “Forwarding and POP/IMAP” in Setting to be configured. Once the “Forwarding” option is configured, the email name specified in this section can be selected in “Forward It” option in “Create Filter” window.
- Delete it: Automatically send new emails to trash.
- Never send it to spam: Never send new emails to the spam folder. Quite useful if your bank emails always end up in spam folder.
- Always mark it as important: Mark new emails important. Once the email is marked as important, a yellow arrowhead appears before the email’s subject’s name.
- Never mark it as important: Never mark new emails important.
- Categorised as: Currently Gmail has 5 main categories, Primary, Social, Promotions, Forum, and Updates. This option makes it possible to assign new emails to one of these groups automatically.
- Also apply filter to X matching conversations: This option lets user to include resulting emails to the filter group as well. If the option is not selected, only new emails are subjected to here actions.
Manage Filters
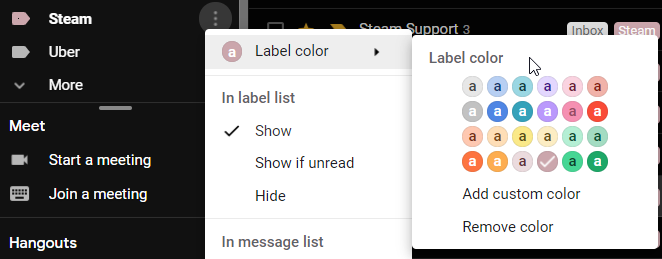
Once a filter is created, the name given to it appears in the left side panel in Gmail. Clicking on the name shows all the emails defined by criteria in “Define the Criteria of Search for Filter” section. Here, the name of the filter, the colour of the filter can be changed as well.


A good one indeed👏😁
Amazing. Really helpful.