Table of Contents
Introduction
Google serves the entire world with numerous services. It has already become the great tycoon of the tech world. It is breaking all the records by providing all services under its single logo. As we also know that tech world is enriched with regular updates, Google also contributes a chunk of innovative and up to date services. But, it’s more than a search engine in current era. Recently, Google has launched its new Backup and Sync feature. In this feature, you can easily backup your files and folders directly from your device. This new feature is the merger of Google Drive and Photos. It operates much like the consumer version of Dropbox and Onedrive.
Back and Sync in Brief
The motive of this merger is to make easy access to Google cloud through a single portal. Through Google Cloud, one can get access to their backup data in an easy way. You have an immense choice in its usage. Users can manually select the desired folders for backup unlike the Google drive which only backs up a specific folder. Afterwards, Backup and Sync feature will automatically sync new data and continue to upload it to Google Drive. This will help in keeping the data intact simultaneously on different places like computer, phone, and various SD cards etc. This is highly recommended for all those people who are conscious of losing their important data. Google Backup and Sync was developed in a convenient way to secure files just as on Google drive.
Main Key Points in Backup and Sync
Following are the simple and concise characteristics of Backup and Sync feature.
- Multiple folders : It has the ability to backup multiple folders and files simultaneously. This process also does not consume much time.
- Smart Filtering System : System, photos and videos automatically go through a sophisticated scrutiny. Through this, they are automatically uploaded to the Google photos.
- Explicit Duplications : It works with a detector which identifies the duplicate photos and videos. At the end, single version of the file is uploaded to the Google Drive.
- Separate folders : Google drive manages two separate folders. One folder is assigned for classical backups of Google Drive directly from the computer. While the other folder is for Backup and sync which shows up all the computers as an application location.
- External Storage Mediums : It is very useful for backing up files from an external storage medium. The mediums that could be backed up for data preservation include pen drives, hard drives, digital cameras. In this way, it makes it convenient for the professional camerapersons to rapidly back up the captured images.
Guidelines to Set It up in The Computer
The procedure of setting up Google Backup and Sync feature is very easy. We will guide you through step by step instructions from its installation to its implementation.
Install the Main Software
- First of all, open your browser and put the following link: Download Google Drive
- After it gets open, click on the blue button to start downloading Google Backup and Sync.
- When the download is completed, install it by following the prescribed steps.
- Once the installation is completed, go to start menu and launch it. In case you are not getting it on the top, then find it through the search box.
- Select the “GET STARTED” button. After clicking on it, initial steps will start appearing on your screen. You have to follow step by step to complete it before its usage.
- Now the Google Backup and Sync is ready to be launched after the all primary steps.
Configure the Software
- Now you have to sign into Google Drive. In the first step, type your Gmail account details and click on next button.
- In the second step, there would be 2 options i.e., Backup photos and videos and Backup all file types. Select any one option. But it is strongly suggested to only Backup photos and videos. In this way, this application will automatically backup all of your videos and photos into a single platform. While the other type of files is suitable to be uploaded on Google Drive. The only purpose of offering you these two options is to give the choice to the users, because some users are more interested in using Google photos, not Google Drive.
- As the final step, you will see “Google Drive” with two options. Out of them, select either “Sync Everything in My Drive” or “Sync Only These Folders“. This option is basically for legacy users who prefer to stick to classical Google Drive.
Start Backing up Files
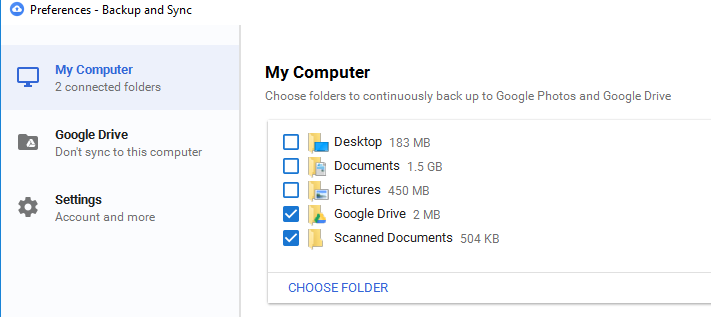
Now give permission to the application to upload the files. For uploading these files, you have to select the folders from the “My Computer” menu. By default it lists out all the user folders which come with the operating system. If user wishes to add anything else, the “Choose Folder” button has to be used.
Check the Synced Files
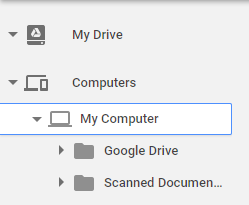
Visit this URL: https://drive.google.com/drive where you can see the uploaded files by checking into drop-down menu. There is a Computer Icon on the left side of the panel. When you click on it, folders will appear in an hierarchical form under each computer from where the files were uploaded. Additionally files uploaded to Google Drive folder can be seen in “My Drive” folder which is dedicated for legacy purpose, and only for classical Google Drive.
Configuration of My Drive Folder
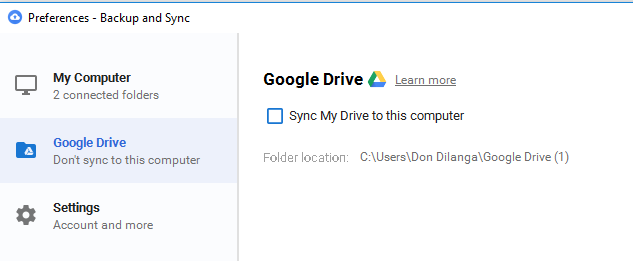
My Drive is basically all in one folder. It includes all the backed up files which are synced through the former Google Drive. Through setting it up, it would be easy to find all uploaded files directly by using your computer.
- To set up Google Drive, open up the application. Then click on the Google Drive.
- You have to select the checkbox – Sync My Drive to this computer. After that, Google drive service will upload all files in Google Drive folder directly into the My Drive on Google Drive website.
Configuration of External Storage Mediums
Google Backup and Sync also allows the users to connect external storage medium to have a backup of their data. Following are the steps to configure it:
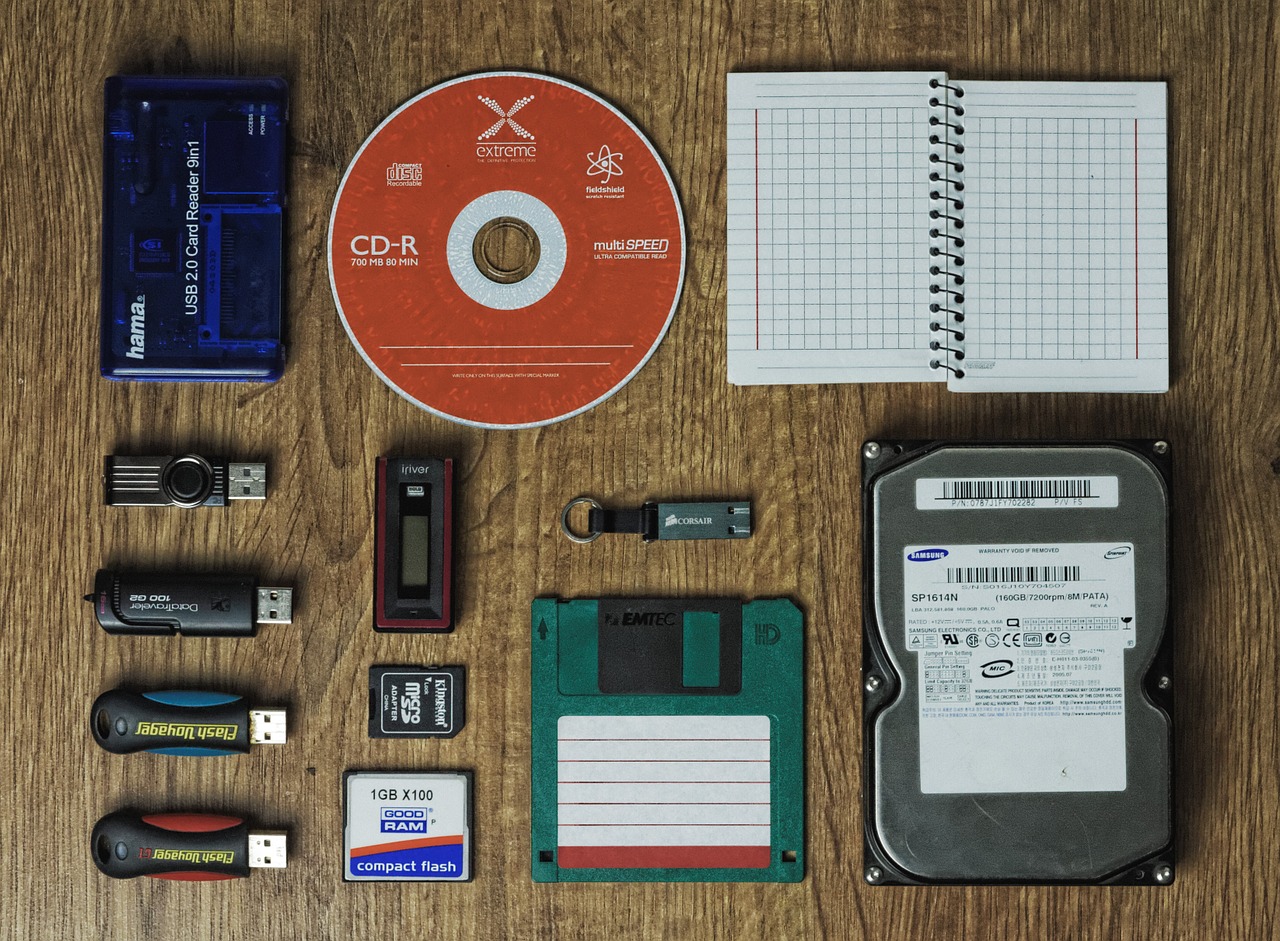
- Plug in an external storage device with your computer such as a USB drive or a SD card while Google Backup and Sync is running.
- Confirm its successful connection with your PC. See the above screenshot as an example
- Now, wait for a message from Backup and Sync, which will appear on the screen. It will give you two options out of which you have to click on Backup. After selecting it, the backup process will start.
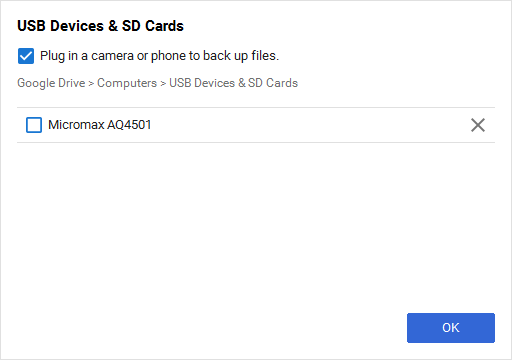
- In case, you don’t want to back up your device’s data, open the preferences menu. Out of this menu, select USB Devices & SD Cards.
- After going into USB Devices & SD Cards, disable either the particular device or “play in a camera or phone to back up files”
Configure Backup Process with Photos and Videos
As we know that Google Backup and Sync application came into existence after the merger of Photos/Picasa and Google Drive app. So, the people who have no concern with Google Drive now have to process through it first, but it’s not a big issue as functionalities of former Picasa can be made to work with few clicks. Following are the steps to configure backup and sync to sync only photos and videos to Google photos.
- Start the application by clicking on its icon. Then go to its Preferences.
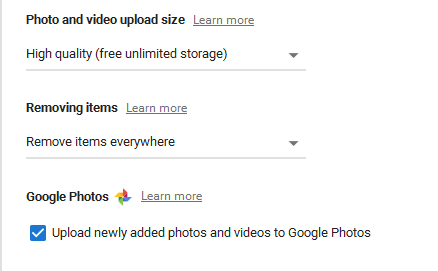
- Now, un-check all the folders appearing on the My Computer menu leaving Pictures or Videos checked only, then check “Upload newly added photos and videos to google photos“
- Go to Google Drive menu and deselect it as well. By doing so, only pictures and videos will Sync and Backup.
- After performing all these steps, your Photos and Videos will be sync successfully. To view these, insert the following URL into the address bar: https://photos.google.com/
How to Remove Duplicate Files in Backup and Sync
Use PowerShell
Google Backup and Sync usually helps its users to tackle duplicate files, but It’s not an easy process to be performed solely by Google Drive. However, this can be made very easy with the support of Windows PowerShell. Here is the guide about using Windows PowerShell in an effective way:
- Again open the application by clicking on its icon.
- Take notice of all the folders out of My Computer menu. Also, note down the paths of each folder as well.
- After noting down each path, use the following Shell script for removing any type of duplicate files. These files will be removed directly from the directories.
You have to repeat the step for each folder. The following script removes any type of a file from Google Drive folder. Copy it and use it on “Windows PowerShell” application
Get-ChildItem -path “$env:userprofile\Google Drive”*  -include *.* -Recurse | Get-FileHash | Group-Object -Property hash |
Where {
$_.Count -gt 1
} | % {
$_.Group | Sort-Object $_.Name | Select-Object -skip 1
} | Remove-Item
Use Clone Files Checker
Clone File Checker is used to remove duplicate files from classical Google Drive. This segment demonstrates how to remove duplicate files on Back and Sync. This is same as the aforesaid powershell method but much more convenient.
- First download it from the internet, then install it by proceeding with a given instructions on the setup file.
- After its successful installation, open Back and Sync, go to its preferences, hover the mouse cursor on the added folders in My Computer. This will show you folders location. After that, click on the Add button in Clone Files Checker to add that folders to it.

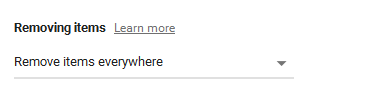
- Confirm that “Remove items everywhere” is selected in Backup and Sync tool. This confirmation will make sure once the local duplicate files are gone, it will reflect in the cloud side as well.

- Now go for the Start Search button. You can also select the checkbox and modify them to get more accurate results.
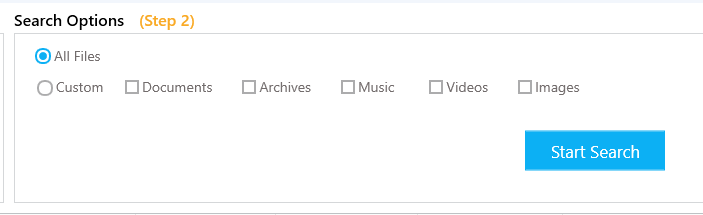

- After selecting the above box, you will have a scanning process. After this process, select the Fix Wizard.
- Select the one option out of the two i.e., Newest or Oldest files.
- Now click on the Permanent Delete button to remove them forever.
- At the end, just click on the Continue button to finally delete the duplicate files.
- Now Backup and Sync tool will start an action to sync up all the changes to the cloud.
- Whenever sync up process will get completed, all the duplicate files will be deleted from the cloud also.

like this….keep posting such informative articles