Humans breathe and eat Wifi these days. Whenever we are out for something, we constantly keep on checking for Wifi hotspots and asking for passwords in order to access to the world wide web. Even though it’s not a big deal to grant access to our personal Wifi network, sometimes it may be honestly a bit annoying, especially when it interferes our works or if a large amount of bandwidth, which is quite expensive in certain areas, is used. Nevertheless, people connect or at least try to connect their phones to our Wifi networks. If it annoys you and if you want to secure your Wifi connection from both intruders and close individuals, or if you want to hide your Wifi network from anyone who is looking for a hotspots to connect, but are unable to refuse due to the close relationship, then this tutorial is for you. At end of this tutorial, you will learn how to secure your Wifi network, and hide it from public. I change my Wifi password every once in a while, and It hardly takes a minute or so to do, and therefore it’s strongly recommend to keep the Wifi password updated.
How to Change Your WiFi Password?
1. Access to a device which is connected with the router which has the Wifi functionality. This device can be anything, PC, Macintosh, Laptop, Macbook or even a smartphone where browsers like Chrome is installed. However,It’s strongly recommended to use an ethernet connection as if the Wifi password isn’t remembered, there is no way to access into the router without having an ethernet connection, and thus it’s better to use an ethernet connection at the first place, and if the password of the router isn’t remembered it can easily be recovered by pressing this small button which is in almost every single router.
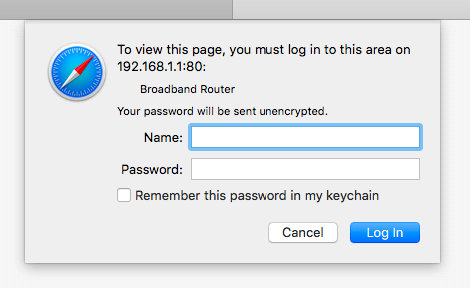
2. Type the following IP address in the “address bar” of the browser – 192.168.1.1 and press enter to gain access to the router. A window as seen in the following screenshot will appear asking the username/name/id and password. The default password for any router is either admin/password or admin/admin. However, if it doesn’t work, the authentication details can usually be found on the back of the router.
If you are using a mobile device, and on Chrome, then press options and tick on “Request Desktop Site.” to make it works as in desktop version. Make sure the smartphone has enough screen space for the aforesaid popup to appear.
3. From the top menu bar depending on the router model and its version, find the “Interface Setup” and click to activate it, then locate “Wireless” from the sub menu under it to activate it again.
6. Setup the SSID and install a password to make it more secure, and hide the Wifi hotspot from everyone. Now it’s only accessible if the SSID of the hotspot is known, otherwise it’s not even possible to discover when searching for a hotspot.
Broadcast SSID : Change it to NO to hide the hotspot from public, but it’s possible to access it if the SSID/password are known. So make sure you don’t share the SSID with anyone.
Authentication Type : Switch it to “WPA2-PSK” for having a strong protection, and secure it from brute force and dictionary attacks. However, if your device is quite old or outdated, then WPA2-PSK may not work as it’s a recent implementation, in that case use either WPA or WEP, but it’s not recommended to use WEP as it’s quite vulnerable to brute force and dictionary attacks.
Encryption : Switch it to AES, what it means Advanced Encryption Standard which encrypts the connection between the hotspots and the device connected with it, and thus intruders are unable to snoop around.
Pre-Shared Key : This is the password of the Wifi hotspot. Make sure it’s unbreakable, and unguessable. Use this site ( HOW SECURE IS MY PASSWORD? ) to determine how strong the password is.

7. Save changes.
If you connected to the router via a wireless connection, you will automatically be disconnected from the Wifi, as you have just changed its password. Just use the new authentication details to regain access to the WiFi connection.
If you have any questions or suggestions regarding this topic, please drop them in the comments below.


